Sunday, September 22, 2013

Weekly Digest #2: Lipstick, powder and paint

posted by Hddvh
Welcome to the second episode of


Weekly digest!


A biweekly summary of links guiding you to great tutorials, product reviews worth a look, breath takingly painted miniatures, interesting sculpts and awesome inspirational sources. 

If you've missed the first part of this sumamry you can find it here

This time I've collected more inspirational links then miniatures. So prepare for a lot of quiet interesting step-by-step articles, reviews and tutorials!


Inspirational


  • Chris Clayton, the person behind Modelworks showed his way of creating a stunningly realistic painted face on a 1/6 scale bust. Although this news got already around I'll name it here as it is realy stunning and should be seen by many many people! Above you see a first shot of the finished bust by Mathieu Fontaine that I've found over at facebook.
  • How to make spikes out of iron powder and superglue by Weisern
  • Do you ever wanted to know how people create a realistic asphalt on their bases? Then you should take a look at this tutorial over at The Brush Brothers Blog
  • Here's a late, but different review of the Games Day Germany written by one of the judges.
  • And as we're into the games day here you have the first 2 articles about Roman's massive Diorama which got him the Slayersword. Part 1 and Part 2
  • If you're still looking for a solution to transport your figurines I have 2 options for you (and a third one will follow soon on this blog!): Go the simple route and buy a completed box (a nice review of the box hobbyzone offers) or use parts of our favorite store IKEA. (a self made, low budget box)
  • Some interesting thoughts and pictures about Reapers first Kickstarter: Reaper Bones
  • Simon Miniatures is known for exquisite miniatures. Here's a review of his Sigfried.

Miniatures


Sculpts


If you've found any article, miniature or inspirational pictures feel free to contact me so I can add it to the next weeks episode of weekly digest!
 
- - - - - - - - - - - - - - - - - - - - - - - - - - - - - - - - - - - - - - - - - - - - - - -

Stay up2date! If you're not yet a follower of Miniature Fairy Tales you should subscribe and / or like our Facebook page.

Monday, September 16, 2013

Fairy Queen Medb

posted by Nathelis
Hi folks,

the fairy Queen finally finished! Been a long time since I completed a showcase project (due to all the tabletop distractions), feels good to finally have something new in my showcase.

Please check out the photos and if you like the miniature, vote on CMON and Putty&Paint for it!


happy painting!

Nathelis

Saturday, September 14, 2013

Hey, Mr. Rhino - Part III

posted by DarkSpawn
Hi folks!

Time for a great update of  Mr. Rhino!

Many things happend since the last update, I changed the loincloth, which was looking like a skirt, added some armor parts and so on. For the forged look of the armor parts I used a dental tool called "Kugelstopfer" in german, I don't know the correct name in english, but here is a (crappy) picture from my tool. You can find it on eBay or Amazon for example.


And now pictures, please. ;-)


I also started a first sketch of his weapon. We will see if it would fit with some more details on.


So long!

DarkSpawn

Friday, September 13, 2013

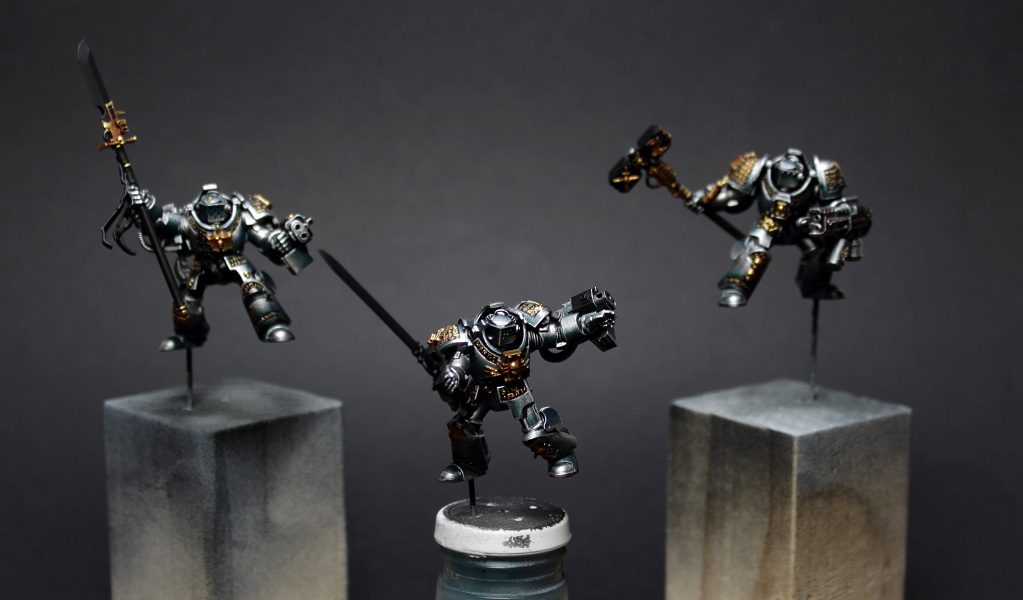
WIP: Grey Knights Terminator Squad (finished)

posted by p1per
Heya!

Here we go, finished Grey Knights Squad. Well, they are still "WIP" but my part of the commission is done (only TMM parts). All the other details will be painted by the customer.

Pictures are not that great but guess better than nothing (it's a pain in the a.. to take decent pictures of miniatures that only consist of metallic paint *arg*). ;)

Squad Front

Squad Back

Single Miniature Views

..and if you missed my other WIP post here's my color recipe for the painted TMM parts:

Silver-TMM:

Top Highlight: Vallejo Air Aluminium #71.062
1st Highlight: GW Mithril Silver

Basecoat: GW Boltgun Metal 

1st Shadow: Reaper Brilliant Blue #09116
2nd Shadow: P3 Coal Black
3rd Shadow: P3 Coal Black : GW Chaos Black ( 1 : 1 )

Shadows are glazed in multiple layers over the basecoat to get a smooth transition and to have matt non-reflective shadows.

Gold-TMM:

Highlights: Vallejo Game Color Polished Gold #72055

Basecoat: GW Shining Gold

Shadows: GW Scorched Brown

Same here for the shadows as with the silver - glazing multiple layers over the basecoat and getting more opaque towards the deepest shadows.


So long!

p1per

Thursday, September 12, 2013

Wip: Fairy Queen Medb 2

posted by Nathelis
Hi folks,

the fairy queen project is nearing its end, so heres a final wipshot. Next post from me will be the finished fairy queen around sunday.

So what still needs to be done? I compiled a list for myself with the help of my painting friends:

* The dress still needs smoothing and some tweaking on the highlight shadow situation
* Hair needs additional layers of midtones and highlights
* the flowers in her hair should be changed to white and pink
* the fan will be painted burlesque style, also like the flowers, white and pink
* there is a tiny darker spot above one of her eyes. needs to be fixed


keep on happy painting,

Nathelis

Wednesday, September 11, 2013

Borrack The Bull General (Review)

posted by Hddvh

The world has fallen into chaos. Jade Emperor, ruler of the three realms has gone missing. Soon after the demons escape from the Geo-core, they strike swiftly to the four kingdoms on Terra. Demons have slowly seized control over the world.

While the gods in heaven with their power fading alongside them, they couldn't offer any assist on Terra. Mortals cannot gain any foothold at their own realm with the demons invasion. Fate has chosen four pilgrims on a journey to retrieve the lost holy scripture, which may hold the key to bring salvation to all...


This is the first part of a still continuing wave of spoilers Marrow Production shared with us over at their Facebook page back in june. A wave reaching many places (about 1400 Likes so far) to spread the word for a new game called Journey: Wrath of Demons

Marrow Production is created by RAY.WONG and Hon Ho.

It's a fast-paced and exciting cooperative board game, with highly detailed miniatures which intrigue for one to four players. Currently in development... But as it can be seen at their page it's coming close to an end and we can finally back the upcoming kickstarter!

One of the Playtest-Shots from Marrow Productions shared over at facebook


Highly detailed miniatures in a board game? Yes, you've got it right. And that's where this post really starts!

As Marrow Productions reached 500 likes they gave away three miniatures to three lucky winners. They repeated this as they reached 1000 likes. And guess what? I'm one of the lucky 3!


Some days ago I received my prize. Borrack The Bull General! What a beast! This miniature is absolutely amazing. Something that just makes me wanna back the kickstarter more and more. Impatiently waiting for the start now...


As this is a board game that also offers highly detailed miniatures for painters I'll split all my opinions about the quality into "gaming wise" and "painting wise". There are clearly differences that should be named on different points. Lets start diving deeper now!


Gaming wise the casting quality is superb! There are only tiny mould lines which are nearly invisible. Every single detail sculpted there is crispy. A pure joy for gamers: Unpack, fell in love and start gaming. Regarding the quality of this resin cast from the opposite side, there's nothing more to add. As a painter you'll carefully remove the named mould lines, fill those supertiny gaps and yu're done with it.

If there's any assembly necessary it will done within no time. The Bull General comes in 3 parts (mine was already glued). Here's a picture I've found at Marrow's Facebook page (thanks for lending me your pictures mates!):


The usage of resin ensures to cast all these tiny details like chains, scratches and other sculpted textures. Painting wise a welcomed material. Gaming wise it might be a bit too vulnerable (the hammer was broken when the miniature arrived even if it was packed safely and carefully - but who knows what happened during the trip of several thousand miles?). Please don't nail me on the wall if I'm wrong: I'm not sure about this as I don't have a lot of experience using resin miniatures for gaming purposes.

The following picture shows you a seize comparison.

From left to right: 28mm TrueScale // 28mm Hero Scale // Borrack The Bull General  54mm

On the left we have a beautiful noble lady by Thunderbolt Mountain Miniatures, 30mm true scale it is. Right beside this beauty we can find my allmighty, one armed ork boy from GW. Also 28mm, but a lot more bulky then the beauty on the left. On the right we have Kaernus from Enigma, 54mm. And the Bull General still tops him! I told you: It's a beast :D


Conclusion:

If my best friend would ask me for advice wether to buy or not to buy this miniature I'd highly recommend him to buy this one. It will be worth every cent invested.

Big thanks again to Marrow for this great miniature and all those that we just have seen on pictures so far. Keep up the great work, feed us with small teasers every now and then and kick off your kickstarter when time has come. We're all waiting impatiently for this great game.

Cheers
Arne

- - - - - - - - - - - - - - - - - - - - - - - - - - - - - - - - - - - - - - - - - - - - - - -

Stay up2date! If you like this article be follower of Miniature Fairy Tales and subscribe and / or like our Facebook page.


Monday, September 9, 2013

Busy at the Warhammer Workbench

posted by SelektorKjulu
Hi!

As I said im building up a O&G army. Well this odysee will take a bit. because I dont want a dipped army. So I will show you my work in progress on my  40  nightgoblins mob. I want that every little gobbo is still unique. I startet with a reddish brown, and highlighted the cape with an old GW paint - Ruby red. Then I painted freehands with an dark orange on their capes. Its like Zen and the art of painting a Goblin Mob. there is still a lot to do and no end in sight.


On the other side of my workbench there is a GW Ghorgone, a very tall model im doing for a commission. I´m shure that guy will never put this model on the gaming table, because it's not very good in battle. This one is great for painting Skin though. Here I can practice with my airbrush. On the model I just did some pre shading. I also will paint his head first so he is decapitated at the moment.


I also have new ideas for my next showcase project. On a hiking trip last week I found this skeletal flower. I´m not sure but think it's a thistle. I want to combine it with the concubine from Hasslefree on the base. Maybe i will build up a dryad or something similar.


So lets tidy up my workbench so work can continue. see ya!

Exploring BeeSPutty - The Story goes on!

posted by Hddvh
Hello there!

Just a quick post today.

Right now the sketch of my recently showen sculpt is hardening in the oven. I thought I might share some pictures of my current progress with you while I have to wait for this process...


I've used BeeSPutty here. A new sculpting putty which I really like. tbh I don't have a lot of experience when it comes to sculpt complex figures with different putties, but I'm really satisfied with the characteristics of this one. Something I'll definitely stick to! 

- - - - - - - - - - - - - - - - - - - - - - - - - - - - - - - - - - - - - - - - - - - - - - -

Stay up2date! If you like this article be follower of Miniature Fairy Tales and subscribe and / or like our Facebook page.


Sunday, September 8, 2013

Weekly Digest #1

posted by Hddvh
Stay up2date! If you're not yet a follower of Miniature Fairy Tales you should subscribe and / or like our Facebook page.

 - - - - - - - - - - - - - - - - - - - - - - - - - - - - - - - - - - - - - - - - - - - - - - -


Welcome to my first episode of


Weekly digest!


A biweekly summary of links guiding you to great tutorials, product reviews worth a look, breath takingly painted miniatures, interesting sculpts and awesome inspirational sources.
To be honest, it's not an idea of mine but of Adam Stefańczyk. He has been collecting a lot of hot links for us on his polish blog. Sadly most of us are not able to read his content without using a translator like google. You can find his lastest collection right here. So I've decided to start something very similar to his weekly report and bring you a summary of what happened the past weeks on every 2nd Sunday.


Inspirational
 
  • Den of Imagination promo video
    A nice insight into our hobby and the work of those crazy guys!


Tutorials & Reviews
  • Check out the Winter White Wash Camo tutorial over on the 5th dimension.
    If you ever wanted to know how to achieve these supercool white weathered vehicles you should check this tutorial. 
  • Painting a dragon from start to finish by Studio Akaranseth
    What a bummer! A great step by step article about painting one of the dragons from Darksword Miniatures. 
  • Skink priest step by step by Sproket
    Here's part 1 of David's upcoming articles how he's painting one if the currently most famous miniatures: The GW Skink Priest 
  • Vehicle painting an Weathering Workshop with Farbfanatiker by (T)Raumschmiede
    Here you can find the impressions of a special workshop held by Farbfantiker. He taught his students to paint and weather a tank within a short time to obtain a geat result.
  • An interesting call to promote and sell your painted miniatures. I'd highly recommend to send an email to Martin if you want to push the highest bid up in the sky (better talking of a more realistic price worth your effort)
  • Another great tutorial, this time it's all about painting leather in a very realistic way.It's really worth a look!


Hot miniatures


Sculpts 


If you've found any article, miniature or inspirational pictures feel free to contact me so I can add it to the next weeks episode of weekly digest!
 
- - - - - - - - - - - - - - - - - - - - - - - - - - - - - - - - - - - - - - - - - - - - - - -

Stay up2date! If you're not yet a follower of Miniature Fairy Tales you should subscribe and / or like our Facebook page. 

Friday, September 6, 2013

WIP: Grey Knights Terminator Squad

posted by p1per
Heya!

After finishing Sethin I started painting a Grey Knights Terminator squad which will be used for gaming, so keep that in mind when looking at the pictures. ;) Three are already finished and 2 more to go. You will realize that the details aren't painted yet so why am I saying they are finished? I will only be painting the armour / TrueMetallicMetal parts as part of a comission, details will be painted by the owner later on. :)

...and here are the pictures of the current 3 finished Terminators:

First one

Second one

Groupshot 1st and 2nd

Groupshot 1st, 2nd and 3rd

And as a little bonus if you like the metallics here's my color recipe:

Silver-TMM:

Top Highlight: Vallejo Air Aluminium #71.062
1st Highlight: GW Mithril Silver

Basecoat: GW Boltgun Metal 

1st Shadow: Reaper Brilliant Blue #09116
2nd Shadow: P3 Coal Black
3rd Shadow: P3 Coal Black : GW Chaos Black ( 1 : 1 )

Shadows are glazed in multiple layers over the basecoat to get a smooth transition and to have matt non-reflective shadows.

Gold-TMM:

Highlights: Vallejo Game Color Polished Gold #72055

Basecoat: GW Shining Gold

Shadows: GW Scorched Brown

Same here for the shadows as with the silver - glazing multiple layers over the basecoat and getting more opaque towards the deepest shadows.


That's it so far - see 'ya soon ;)

p1per


Thursday, September 5, 2013

Wip: Fairy Queen Medb

posted by Nathelis
Hi out there,

a little update on my fairy tales project for the Brushbrothers.de contest.

Spent 4 hours on smoothing the skin, not finished, but it´s a huge step in the right direction.


keep on happy painting,

Nathelis

Wednesday, September 4, 2013

Selektorkjulu´s first strike!

posted by SelektorKjulu
Hello! 

I am new at Miniature Fairy Tales. I'd like to introduce myself, my name is Jürgen, I'm 30 and I live in Lower Austria, close to the Danube. When I was still in school I collected some Wahammer 40k stuff. But due to the fact that I didn't know anyone who played at that time, I gave up on this game. Now it took me two years to get back into the hobby. At the moment I'm just building an orcs and goblin army for Warhammer Fantasy. Occasionally I play some tournaments with my dwarfs. In my opinion I´m the worst general in the Warhammer universe. The aspect of painting has always fascinated me more and I want to take a nicely painted army into battle, so I am constantly striving to deliver beautiful results. Of course there is still a lot to learn. In order to train my skills I also paint showcase miniatures. From mini to mini it gets better and better. So I show you my last figurines.


This is a huge model. But with the help of my airbrush it wasn't so time consuming. I'm a big fan of the forest goblin models with yellow warpaint on. In the preparation of the figures I've made ​​sure that all the little Goblins are sanded and I removed the flash. Of course it is a model which I take to battle, so not everything has to be perfect but the overall impression must be right.


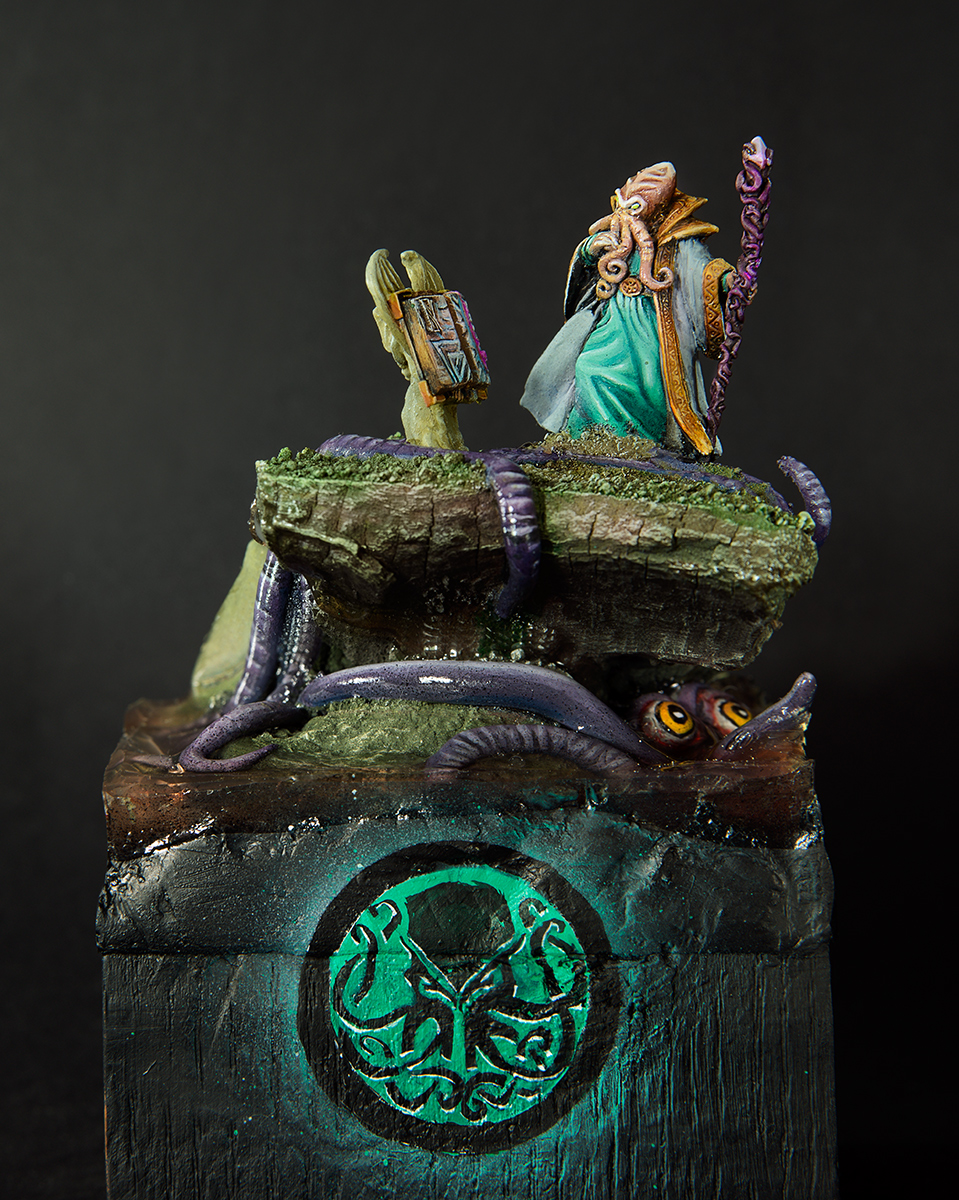
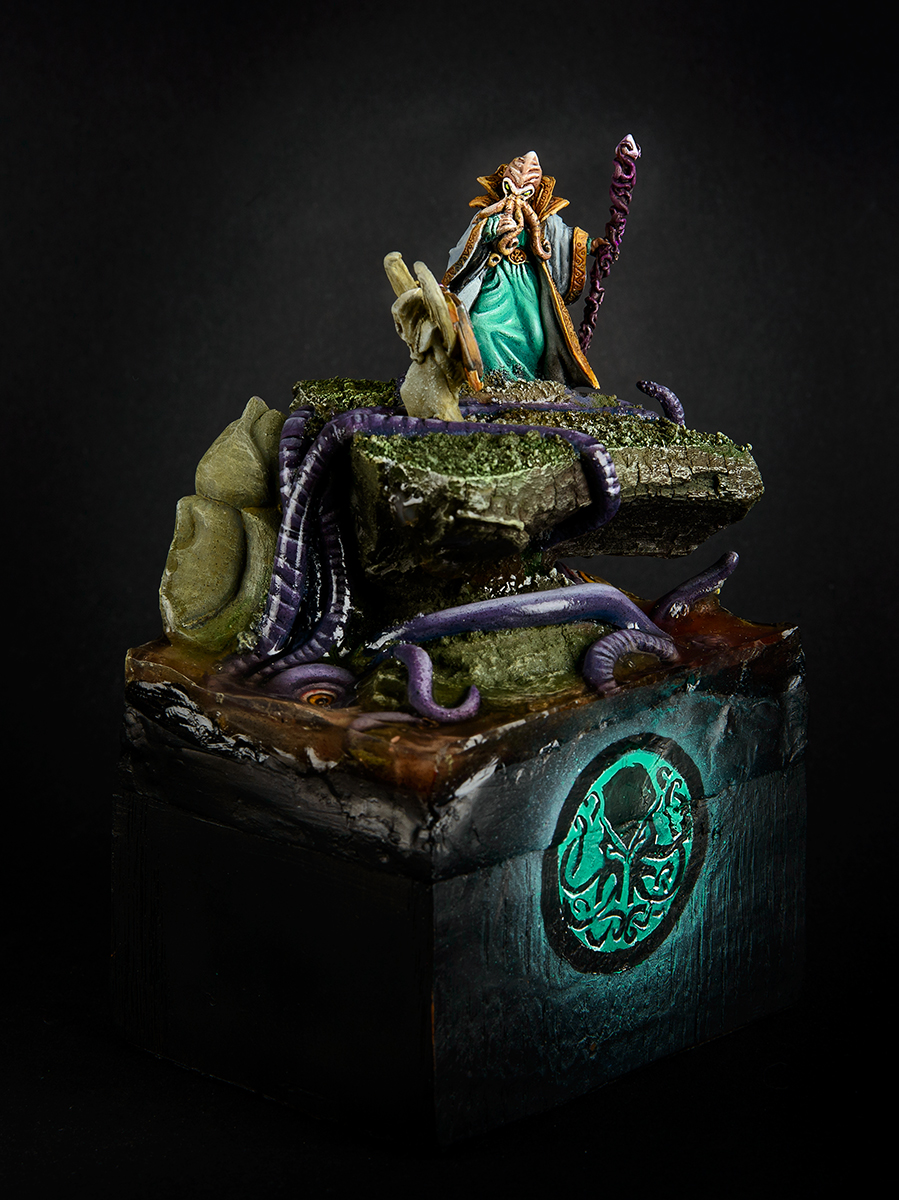
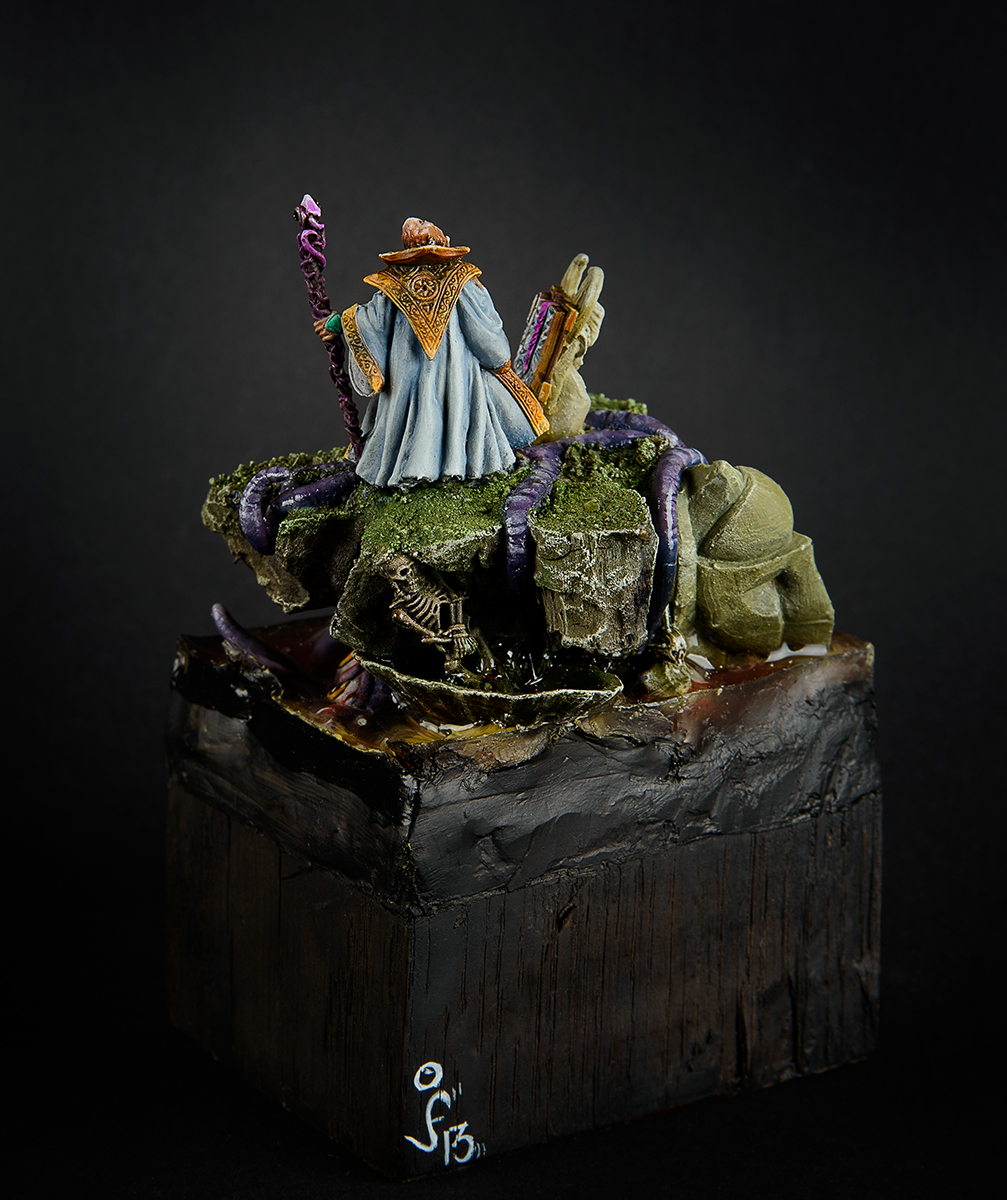
So, here is my last work. This I have completed for the Brushbrothers and Sisters Fairy Tale contest. I call it "A day in R'lyeh (Cthulhu Mythos)" Its the Bathalian from Reaper.

A lot of emotions connect me with this piece. As yet so a lot has gone wrong and I was close to tears. I used the wrong water. The plan was to pour a body of water all around. Instead of a two component artificial water I took the natural water from "Faller". Epic Fail. Bu the time I had for the contest ran out and I had to finish it quickly. Unfortunately there was also no time to sand the base, it´s just black paint over milliput. Somehow this miniature is like a piece of my soul. So for the deadline I had to face this is the optimal solution.

If you like my work, please vote on putty&paint for it:
Putty & Paint

thanks in advance

I hope you liked my first blog entry . Next time I will show you my 41 night goblins who are now on my workbench and beg for color.

See you soon

Selektorkjulu

Tuesday, September 3, 2013

DkoK: Painting a Leman Russ Tank in winter camo

posted by Nathelis
Hi folks,

I´d like to show you how I paint my Leman Russ tanks for my DKoK Army. Since they will be fighting in a witer urban environment I decided to  use the old "white wash" camo that was used during WWII. It basicly is white paint over your normal tank color, applied by the soldiers during wintertime.

Let's get started with this step by step.

1.  Give the tank a light basecoat with a black primer and then apply Vallejo german panzer grey primer with an airbrush

2. Next is the modulation of the tank, we want it be a bit lighter on the upper sides. So I use some colors of the AK interactive (only "AK" from now on) to achieve this with my airbrush.


3.  Now I apply the company marking, which is a violet stripe.


4. Apply the decals you want. But first, put some gloss varnish on the area. After the decal is on apply 3-5 more layers of gloss varnish.


5. Next step is an invisible one. Spray the whole tank with AK Heavy Chipping medium and let it dry. Afterwards spray a thin white layer on the tank (with zenithal light in mind, so spray upper areas a bit more intense).


6. Now the weathering fun begins. Grab an old brush and some water and scrape the white paint randomly off the tank. On some areas you can increase the wear and tear and some other areas you might leave white. This gives a more realistic impression. After this step is finished, spray the whole tank with Satin Varnish. This is for protection of your work so far.


7. In the next couple of steps we use some more AK products. First up is the Filter blue for panzer grey, which is great for darklining all the rivets on the tank. You don't need to be overprecise right now, we will get rid of the excess filter in the next steps. So just let it flow in the recesses and again, have fun.


8. Paint rust streaks on the tank. Use a good brush with a fine tip for that. Vary the lenght of the streaks for a more realistic impression.


9. Now the magic is kicking in.  We use white spirit (or odorless turpentine) to blend all the excess filter with the rest of the tank. Also blend the rust streaks while moving your brush up and down. Use just a little bit of white spirit for that, theres no need to flood the tank. After this step when the paint is dry, coat everything again with Satin Varnish.


10. The same as step 8 but only with Winter streaking grime and you can also add the streaking grime to some areas you want to modulate in color.


11. Blend with white spirit. Also I have added mud to the track and lower sections of the tank. the mud was generated by mixing Natron, AK Fresh Mud, AK Wet effects fluid and brown/grey pigments. This can then be applied where wanted and sealed with a coat of satin varnish. After the satin varnish more Wet effects can be added to make some areas appear like fresh mud.


12. Painting of the metallic parts like the Aquila on the turret. Just finishing work really. Tank driver painting etc... (Tank driver isnt painted in the example yet).


This is how a force painted with this technique can look like:


Hope you enjoyed the tutorial, if there are any questions please contact me in the comments. Also, for more in depth tutorials, visit the Blog of Mig Jimenez: http://migjimenez.blogspot.co.at/

kind regards,

Nathelis

- - - - - - - - - - - - - - - - - - - - - - - - - - - - - - - - - - - - - - - - - - - - - - -

Stay up2date! If you're not yet a follower of Miniature Fairy Tales you should subscribe and / or like our Facebook page.