Hi,
I´m back from the Massive Vodoo Beginners Workshop in Vienna! As I took the class the second time, I could paint what I wanted and I chose Luz and wanted to specialise on two (three) aspects:
- Leather
- True Metallic Metal
- Hair
What can I say? Roman was really helpful, he showed me a complete new way of painting leather and I was really motivated. Was a crazy weekend with over 20 hours of painting, lots of great people and meeting new and old friends.
So is it worth going to the beginners class a second time? Definately! I would say going a second time is even better!. Will be attending a third time in the future...hopefully soon.
Here are the results of the about 85% finished Luz, I will invest some hours this week but she should be finished by end of the week. Stay tuned for that!
regards,
Daniel aka Nathelis
Showing posts with label wip. Show all posts
Monday, May 26, 2014
Luz - back from the Massive Vodoo workshop
posted by NathelisMonday, May 5, 2014
Luz from Nocturna, Skin WIP
posted by Nathelis
Hi folks,
long time no see :) I was quite busy with tabletop stuff and didn't have the time and motivation for showcase work.
Anyways, I´m back with my first 70mm miniature. Lots of work...but now she is in the first stage where I can say: the skin can be shared with the public. Not 100% finished but getting closer to a really nice and smooth skin.
She should be finished in the next month...fingers crossed
kind regards,
Nathelis
long time no see :) I was quite busy with tabletop stuff and didn't have the time and motivation for showcase work.
Anyways, I´m back with my first 70mm miniature. Lots of work...but now she is in the first stage where I can say: the skin can be shared with the public. Not 100% finished but getting closer to a really nice and smooth skin.
She should be finished in the next month...fingers crossed
kind regards,
Nathelis
Friday, September 13, 2013
WIP: Grey Knights Terminator Squad (finished)
posted by p1per
Heya!
Here we go, finished Grey Knights Squad. Well, they are still "WIP" but my part of the commission is done (only TMM parts). All the other details will be painted by the customer.
Pictures are not that great but guess better than nothing (it's a pain in the a.. to take decent pictures of miniatures that only consist of metallic paint *arg*). ;)
..and if you missed my other WIP post here's my color recipe for the painted TMM parts:
Silver-TMM:
Top Highlight: Vallejo Air Aluminium #71.062
1st Highlight: GW Mithril Silver
Basecoat: GW Boltgun Metal
1st Shadow: Reaper Brilliant Blue #09116
2nd Shadow: P3 Coal Black
3rd Shadow: P3 Coal Black : GW Chaos Black ( 1 : 1 )
Shadows are glazed in multiple layers over the basecoat to get a smooth transition and to have matt non-reflective shadows.
Gold-TMM:
Highlights: Vallejo Game Color Polished Gold #72055
Basecoat: GW Shining Gold
Shadows: GW Scorched Brown
Same here for the shadows as with the silver - glazing multiple layers over the basecoat and getting more opaque towards the deepest shadows.
So long!
p1per
Here we go, finished Grey Knights Squad. Well, they are still "WIP" but my part of the commission is done (only TMM parts). All the other details will be painted by the customer.
Pictures are not that great but guess better than nothing (it's a pain in the a.. to take decent pictures of miniatures that only consist of metallic paint *arg*). ;)
| Squad Front |
| Squad Back |
| Single Miniature Views |
..and if you missed my other WIP post here's my color recipe for the painted TMM parts:
Silver-TMM:
Top Highlight: Vallejo Air Aluminium #71.062
1st Highlight: GW Mithril Silver
Basecoat: GW Boltgun Metal
1st Shadow: Reaper Brilliant Blue #09116
2nd Shadow: P3 Coal Black
3rd Shadow: P3 Coal Black : GW Chaos Black ( 1 : 1 )
Shadows are glazed in multiple layers over the basecoat to get a smooth transition and to have matt non-reflective shadows.
Gold-TMM:
Highlights: Vallejo Game Color Polished Gold #72055
Basecoat: GW Shining Gold
Shadows: GW Scorched Brown
Same here for the shadows as with the silver - glazing multiple layers over the basecoat and getting more opaque towards the deepest shadows.
So long!
p1per
Thursday, September 12, 2013
Wip: Fairy Queen Medb 2
posted by Nathelis
Hi folks,
the fairy queen project is nearing its end, so heres a final wipshot. Next post from me will be the finished fairy queen around sunday.
So what still needs to be done? I compiled a list for myself with the help of my painting friends:
* The dress still needs smoothing and some tweaking on the highlight shadow situation
* Hair needs additional layers of midtones and highlights
* the flowers in her hair should be changed to white and pink
* the fan will be painted burlesque style, also like the flowers, white and pink
* there is a tiny darker spot above one of her eyes. needs to be fixed
keep on happy painting,
Nathelis
the fairy queen project is nearing its end, so heres a final wipshot. Next post from me will be the finished fairy queen around sunday.
So what still needs to be done? I compiled a list for myself with the help of my painting friends:
* The dress still needs smoothing and some tweaking on the highlight shadow situation
* Hair needs additional layers of midtones and highlights
* the flowers in her hair should be changed to white and pink
* the fan will be painted burlesque style, also like the flowers, white and pink
* there is a tiny darker spot above one of her eyes. needs to be fixed
keep on happy painting,
Nathelis
Friday, September 6, 2013
WIP: Grey Knights Terminator Squad
posted by p1per
Heya!
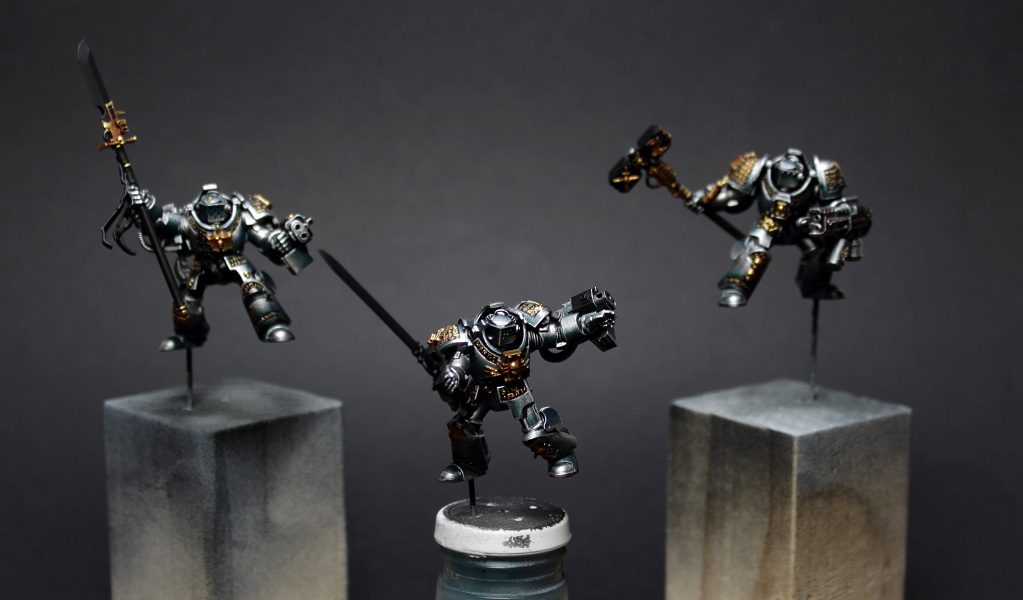
After finishing Sethin I started painting a Grey Knights Terminator squad which will be used for gaming, so keep that in mind when looking at the pictures. ;) Three are already finished and 2 more to go. You will realize that the details aren't painted yet so why am I saying they are finished? I will only be painting the armour / TrueMetallicMetal parts as part of a comission, details will be painted by the owner later on. :)
...and here are the pictures of the current 3 finished Terminators:
And as a little bonus if you like the metallics here's my color recipe:
Silver-TMM:
Top Highlight: Vallejo Air Aluminium #71.062
1st Highlight: GW Mithril Silver
Basecoat: GW Boltgun Metal
1st Shadow: Reaper Brilliant Blue #09116
2nd Shadow: P3 Coal Black
3rd Shadow: P3 Coal Black : GW Chaos Black ( 1 : 1 )
Shadows are glazed in multiple layers over the basecoat to get a smooth transition and to have matt non-reflective shadows.
Gold-TMM:
Highlights: Vallejo Game Color Polished Gold #72055
Basecoat: GW Shining Gold
Shadows: GW Scorched Brown
Same here for the shadows as with the silver - glazing multiple layers over the basecoat and getting more opaque towards the deepest shadows.
That's it so far - see 'ya soon ;)
p1per
After finishing Sethin I started painting a Grey Knights Terminator squad which will be used for gaming, so keep that in mind when looking at the pictures. ;) Three are already finished and 2 more to go. You will realize that the details aren't painted yet so why am I saying they are finished? I will only be painting the armour / TrueMetallicMetal parts as part of a comission, details will be painted by the owner later on. :)
...and here are the pictures of the current 3 finished Terminators:
![]() |
| First one |
![]() |
| Second one |
| Groupshot 1st and 2nd |
| Groupshot 1st, 2nd and 3rd |
And as a little bonus if you like the metallics here's my color recipe:
Silver-TMM:
Top Highlight: Vallejo Air Aluminium #71.062
1st Highlight: GW Mithril Silver
Basecoat: GW Boltgun Metal
1st Shadow: Reaper Brilliant Blue #09116
2nd Shadow: P3 Coal Black
3rd Shadow: P3 Coal Black : GW Chaos Black ( 1 : 1 )
Shadows are glazed in multiple layers over the basecoat to get a smooth transition and to have matt non-reflective shadows.
Gold-TMM:
Highlights: Vallejo Game Color Polished Gold #72055
Basecoat: GW Shining Gold
Shadows: GW Scorched Brown
Same here for the shadows as with the silver - glazing multiple layers over the basecoat and getting more opaque towards the deepest shadows.
That's it so far - see 'ya soon ;)
p1per
Thursday, September 5, 2013
Wip: Fairy Queen Medb
posted by Nathelis
Hi out there,
a little update on my fairy tales project for the Brushbrothers.de contest.
Spent 4 hours on smoothing the skin, not finished, but it´s a huge step in the right direction.
keep on happy painting,
Nathelis
a little update on my fairy tales project for the Brushbrothers.de contest.
Spent 4 hours on smoothing the skin, not finished, but it´s a huge step in the right direction.
keep on happy painting,
Nathelis
Saturday, June 22, 2013
Exploring BeeSputty!
posted by Hddvh
Good morning guys 'n gals!
It's a beautiful morning over here and I'm already relaxing in the garden. Yep, just before the breakfast.
Me and my family are on vacation for some days. As my painting equipment wasn't able to find a space to come with me I decided to take some sculpting tools with me and tested the new BeeSputty.
Here's my result so far, just added basic volumes so far:
As I'm not an experienced sculpteur (this is my 2nd attempt) I'd be happy to receive some feedback from you.
Soon more pictures for you!
Have a nice weekend.
Yours Sleipnir
Tuesday, May 28, 2013
Druss the Legend (Another Barbarian Dude)
posted by Hddvh
Good evening Ladies and Gentlemen!
Today I'm going to share with you my newest project: The Barbarian Dude. Yep, another one on this blog as P1per is painting one too. We both will compete against each other to see who's able to achieve the better result. Just for fun, but it's always nice to have something that pushes you further.
I'll call this my "Druss-Project". Druss is a Barbarian Legend, created by David Gamnell. He wrote several great fantasy novels which are all worth a read! Find out more right here.
So, here's my current progress:
Wait, what? A Cape? YES :)
As you can see I made a minor conversion, hiding his back full of muscles on muscles with even more muscles under a fur cape:
For those interested in how I sculpted the fur here's my way of doing that. 3 easy steps to repeat till completion:
Step 1: Adding a sausage of milliput
Step 2: Using a tool with a thin edge to form the putty into a rough fur-like shape
Step 3: Smooth everthing, bend single hairs of the fur and get a nice transition to the previous line.
Today I'm going to share with you my newest project: The Barbarian Dude. Yep, another one on this blog as P1per is painting one too. We both will compete against each other to see who's able to achieve the better result. Just for fun, but it's always nice to have something that pushes you further.
I'll call this my "Druss-Project". Druss is a Barbarian Legend, created by David Gamnell. He wrote several great fantasy novels which are all worth a read! Find out more right here.
So, here's my current progress:
Wait, what? A Cape? YES :)
As you can see I made a minor conversion, hiding his back full of muscles on muscles with even more muscles under a fur cape:
For those interested in how I sculpted the fur here's my way of doing that. 3 easy steps to repeat till completion:
Step 1: Adding a sausage of milliput
Step 2: Using a tool with a thin edge to form the putty into a rough fur-like shape
Step 3: Smooth everthing, bend single hairs of the fur and get a nice transition to the previous line.
Sunday, May 26, 2013
Barbarian Dude: Miniature WIP 01
posted by p1per
Heya!
Started paintin' the miniature yesterday, not much done yet and consider everything still a work-in-progress but I'll show you a first look at his face. ;)
See 'ya soon ... now back painting :D
p1per
Started paintin' the miniature yesterday, not much done yet and consider everything still a work-in-progress but I'll show you a first look at his face. ;)
See 'ya soon ... now back painting :D
p1per
Saturday, May 25, 2013
Barbarian Dude: Base WIP-Log
posted by p1per
Heya!
Long time no see ;) I haven' posted in quite some time now but I will make up for it with an in-depth WIP-Log of the base I built for my next miniature which will be no other than the Barbarian Dude.
So let's get started:
First thing was to prepare the plinth cut off a piece and make some cuts here and there so the surface would look more natural. Next I glued some corkboard in the back which I will use as a filler for a mountain(-"wall") so I won' have to use so much putty. ;) Afterwards I covered the ground as well as the corkboard with milliput.
So the basis was done, now time for details. I added some minor adjustments to ground and sculpted the mountain.
Next one was easy ... glueing some soil to the ground. :D
Sanded the sides of the plinth and made some adjustments to the stones
Finally time to prime the whole thing - for this part I used a combination of black and white paint:
And last but not least ;) now with some paint on:
And that's it so far. Next steps will be to fill the pond (that cut-out piece) with some 2k water and start paintin' the Dude - FINALLY! :D
So long
p1per
Long time no see ;) I haven' posted in quite some time now but I will make up for it with an in-depth WIP-Log of the base I built for my next miniature which will be no other than the Barbarian Dude.
So let's get started:
First thing was to prepare the plinth cut off a piece and make some cuts here and there so the surface would look more natural. Next I glued some corkboard in the back which I will use as a filler for a mountain(-"wall") so I won' have to use so much putty. ;) Afterwards I covered the ground as well as the corkboard with milliput.
So the basis was done, now time for details. I added some minor adjustments to ground and sculpted the mountain.
Next one was easy ... glueing some soil to the ground. :D
Sanded the sides of the plinth and made some adjustments to the stones
Finally time to prime the whole thing - for this part I used a combination of black and white paint:
And last but not least ;) now with some paint on:
And that's it so far. Next steps will be to fill the pond (that cut-out piece) with some 2k water and start paintin' the Dude - FINALLY! :D
So long
p1per
Tuesday, May 21, 2013
Creating Mud: Part II (picture heavy)
posted by Hddvh
In my last post I was talking about an upcoming step by step on my try for painting the rain-oil-cape (right word? I guess you know what I mean) with oils. Sadly I failed here due to my missing experience and switched over and back to acrylics.
And here's the result after blending colors together and drying the oils on the oven. Do you see the grainy texture all over the cape? :/
But I don't want to withhold the few pictures I've made for the planned step by step. Beware of some ugly pictures... I do believe that I've not diluted my oils enough. But I wasn't in the mood to test it again as progress on this miniature was a bit further at that time:
So let's go ahead. Here's the actual status of the stalker painted with acrylics. He's slowly coming to an end.
Any C&C are highly appreciated. What are you thinking? Does he goes in the right direction?
Read you soon!
Sleipnir
Monday, May 20, 2013
Catelyn Stark, final week
posted by Nathelis
Hi folks,
I realised today that on friday this week there is the deadline for Darksword contest over at Wamp. Tough luck for me, I still need to finish my last entry for it (my 3rd one). This means: painting, painting, painting...
Made some good progress on the sleeves of her dress, but many areas remain unfinished. Lucky for me, her base is already finished so if I concentrate I should be able to finish her till friday.
keep on happy painting,
Nathelis
I realised today that on friday this week there is the deadline for Darksword contest over at Wamp. Tough luck for me, I still need to finish my last entry for it (my 3rd one). This means: painting, painting, painting...
Made some good progress on the sleeves of her dress, but many areas remain unfinished. Lucky for me, her base is already finished so if I concentrate I should be able to finish her till friday.
keep on happy painting,
Nathelis
Tuesday, May 7, 2013
Let's get dirty: A small mud battle
posted by Hddvh
It's been some days since my last post, but the upcoming summer keeps me away from painting in the dark and isolated basement. But I've found at least 2-3 hours to add some more color to my stalker.
I really like how he turned out so far and am very(!) curious about his look after I've painted the big cape. As I'm going to paint that part with oil colors ill try to do enough pictures to create a small step by step for you. Either to help me where I've made mistakes or to show you, how to do that - you can decide in the end ;)
Some time ago I've made some experiences (better experiments) on a small scaled vehicle, mainly to learn more about creating rust and mud. This knowledge was used to add wet'n'dry mud to the boots of the stalker.
First step was to apply a Matt varnish on the boots to add a lot of bright pigments, make sure to use enough to create some texture. Next step: Add gloss varnish to the lower parts and again add a decent amount of darker pigments. This area will later look like wet mud. Try to mix both pigments on your object to et a smoother transition. The bigger your surface the easier it is.
In the end it should look like this:
Soon I can start painting his cape. It will be a pure joy!
Thanks for reading,
Arne
Thursday, May 2, 2013
Projects I'm working on
posted by DarkSpawn
Hello folks!
Now it's time for me to show you some projects I'm working on. I'm in a really creative mood, so I can't focus myself on only one project. ;-)
The first project is a little study of sculpting some folds, I hope it's not to mess. It's about 32mm from head to toe.
The second one is a bust of a canadian RAF-Pilot of WW2. The size is like all my busts - 1/10. It's still a lot of work, especially the fur lining of his jacket is a new challenge for me.
And last but not least, my latest project - a bust of a elf, also 1/10. It's a real fun sculpting it and I'm really happy about the results. Ok, I'm not so happy with the anatomy of the upper part of his chest, but I think I could fix this easily.
I hope you enjoyed my pics and don't hassitate to drop me a line if you have questions or anything else.
Markus
Now it's time for me to show you some projects I'm working on. I'm in a really creative mood, so I can't focus myself on only one project. ;-)
The first project is a little study of sculpting some folds, I hope it's not to mess. It's about 32mm from head to toe.
The second one is a bust of a canadian RAF-Pilot of WW2. The size is like all my busts - 1/10. It's still a lot of work, especially the fur lining of his jacket is a new challenge for me.
And last but not least, my latest project - a bust of a elf, also 1/10. It's a real fun sculpting it and I'm really happy about the results. Ok, I'm not so happy with the anatomy of the upper part of his chest, but I think I could fix this easily.
I hope you enjoyed my pics and don't hassitate to drop me a line if you have questions or anything else.
Markus
Monday, April 29, 2013
Dissolution of Humanity Pt. I
posted by Hddvh
Hello and welcome back dear readers!
It's time to share some thoughts about my new project with you. Again something special for me, and a good friend of course.
A while ago I got suprised by the Sockelmacher who gave me a miniature to say thank you for our friendship. It's this one:
You can find more views after the jump.
I felt honored and was very happy about that gift! Thanks again my friend, it's a great addition to my display cabinet and I really appreciate your rare free time you've invested in painting this one.
In order to give him something back I was looking for a suitable miniature and find this one, a miniature by Evolution Miniatures:
I immediately had a nice idea and am always playing around how to realize that.
My current plan is an post apocalyptic setting with a wedge of a tank in the background to not disturb from the main character, the stalker. It's the first time for me building and painting a tank. I'll take care of taking a lot I pictures while building up the base later (using a saw to part the tank in a fitting seize of the base...) to show you my progress.
But for now there's just a quick shot of first paint on the stalker:
What do you think about using just a wedge of a tank as a background to present the miniature? Feel free to share your thoughts in the comments.
Thanks for reading,
Have a nice start into this week and stay tuned
Arne
It's time to share some thoughts about my new project with you. Again something special for me, and a good friend of course.
A while ago I got suprised by the Sockelmacher who gave me a miniature to say thank you for our friendship. It's this one:
You can find more views after the jump.
I felt honored and was very happy about that gift! Thanks again my friend, it's a great addition to my display cabinet and I really appreciate your rare free time you've invested in painting this one.
In order to give him something back I was looking for a suitable miniature and find this one, a miniature by Evolution Miniatures:
I immediately had a nice idea and am always playing around how to realize that.
My current plan is an post apocalyptic setting with a wedge of a tank in the background to not disturb from the main character, the stalker. It's the first time for me building and painting a tank. I'll take care of taking a lot I pictures while building up the base later (using a saw to part the tank in a fitting seize of the base...) to show you my progress.
But for now there's just a quick shot of first paint on the stalker:
What do you think about using just a wedge of a tank as a background to present the miniature? Feel free to share your thoughts in the comments.
Thanks for reading,
Have a nice start into this week and stay tuned
Arne
Thursday, April 25, 2013
The druid - WIP
posted by Nathelis
Hi folks,
I´m back with my newest Darksword miniature. Painting her up to fit with the tree base as a druid.
Work has already progressed very far, but I still have to tweak some areas and paint some freehands, afterwards adjust the base to the miniature and put a lot of little animals on there.
keep on painting happy little trees!
Nathelis
I´m back with my newest Darksword miniature. Painting her up to fit with the tree base as a druid.
Work has already progressed very far, but I still have to tweak some areas and paint some freehands, afterwards adjust the base to the miniature and put a lot of little animals on there.
keep on painting happy little trees!
Nathelis
Monday, April 22, 2013
Nocturna - Princess of Night WIP 22-04
posted by p1per
Heya!
New WIP of my Princess of Night from Nocturna:
Not sure how much time I will spend on her... right now I'm not really having fun paintin' her and I don't why, I was actually really looking forward to it. :(
Hope you still like the current progress!
p1per
New WIP of my Princess of Night from Nocturna:
Not sure how much time I will spend on her... right now I'm not really having fun paintin' her and I don't why, I was actually really looking forward to it. :(
Hope you still like the current progress!
p1per
Subscribe to:
Posts (Atom)