Monday, September 2, 2013

Pimp my DETOLF: Dust-Proofed!

posted by Hddvh
As many of us I do own a "DETOLF" display cabinet by IKEA to show off and store my painted miniatures and those, which took a break due to other projects I prefer to finish first. It's one of the cheaper but still good looking ways to present our miniatures. 

A while ago Raffa from Massive Voodoo shared his way of adding a proper lighting and a nice but cheap background. I followed his advice and bought a pair of additional lights. What a boost! Im able to see more then just painted miniatures. They started to show me their details in all their greatness :) I've pimped my display cabinet and am very proud of this little change. 

But there's one point... I don't like about this cabinet. It's collecting dust. Pretty fast and a lot of that!


To be honest, I'm pretty lazy when it comes to clean my display regular. It's more like: "Wtf! Why's there so much dust all over again?!". What's following then is an extensive, time consuming process to get rid of the dust from the display boards as of the miniatures. It's also some kind of risky as I have to move every single project out of the cabinet. 

As one of my brushbrothers asked me how he can get his new cabinet dust proofed i started to search for an answer. I never really thought about how to achieve this. But there's a simple solution that guarantees a 99.9% dust proofed cabinet! And best of all: It just costs me around 10€ including pp!

So, what's this cheap solution I am talking about? 

It's a brush seal with adhesive backing (measuring 4.8mm base x 4mm high) attached all around the single door that prevents dust from getting inside of the display cabinet.


Dust-Proofing your display cabinet

Materials needed:

- paper tissue / Kleenex 
- glass cleaner / windex
- about 6m brush seal with self adhesive backing (4.8x4mm) ((I've got mine here))
- a duster 
- a pair of gloves
- a screwdriver 
- a scissor


Step 1 - Empty it

...but be careful! Handle your miniatures with care and try to avoid to drop them on the floor or to bump them on the side panels! Store them safe while you're going on with the next steps. 

Here's how it looks 2 weeks after I carefully cleaned it:

You can easily see where I've placed my miniatures. Very annoying. Damn this dust!

No accidents happened? Great, lets carry on then. If not... Well, it seems not to be your best day. Keep your head up, you're probably not the only one. It might have been even more worse!


Step 2 - The Cleansing

After you've removed every single miniature and stored it safely you can start removing dust and any fingerprints. Make it shiny again! This is where the gloves come in. Wear them to avoid adding new fingerprints while cleaning everything. 

Don't forget to clean the edges (very important!) and outer glasses too.


Step 3 - Sealing-Preparation

As its easier to work with a lot of space it's necessary to remove the door from the display cabinet. 

There are just 4 screws we have to loosen. Be careful and fixate the door while doing that with the other hand. It might fall off immediately.


Step 4 - The Sealing

Now it's time to add the brush seal all around the door. It's quiet easy as it comes with a self adhesive backing. Just work precise here as any misplaced part will be visible later. 

The gaps between the door and the side panels are everything else then even. So it might be necessary to attach the brush seal on the door AND on the side panels to prevent dust from getting in there. 


I guess you can see where's the gap after adding the brush seal. That's the upper part.


And here's the lower part. Later we will adjust the door.

If you've attached the brush seal all around its time to bring back the door into its place. Adjust it by moving it some millimeters if necessary. 

At this time your DETOLF should look like this:


Step 5 - Re-Organisation

Now it's time to get all your beloved projects back in place.

Again: Be careful to not bump your miniatures on any furnitures. 

This is how my display cabinet is looking after this complete roll up:


The black clothing on top was used to get better photos for you. I'll definitely add something like this permanently. I'm also considering of replacing the back with a mirror. But I'm not sure about that right now. 

Do you own a DETOLF too and pimped it in any way? Tell us in the comments. I'd like to gather as much ideas as possible to sum up in another article so everyone can get the most out of his display cabinet. Who knows, some day IKEA might change their DETOLF to our likes...

- - - - - - - - - - - - - - - - - - - - - - - - - - - - - - - - - - - - - - - - - - - - - - -

Stay up2date! If you're not yet a follower of Miniature Fairy Tales you should subscribe and / or like our Facebook page. 

Thursday, August 22, 2013

Sethin finished

posted by p1per
Heya!

Finished a new miniature, Sethin from Rackham. In my opinion up until now one of the most beautiful miniatures ever sculpted, at least for me it's an all-time-favourite and finally I haven a painted version sitting in my display cabinet. :)


Hope you like her and if you want to vote:

Putty & Paint

CoolMiniOrNot


p1per

Tuesday, August 20, 2013

The Barbarian Dude Collection

posted by Hddvh
Aloha!

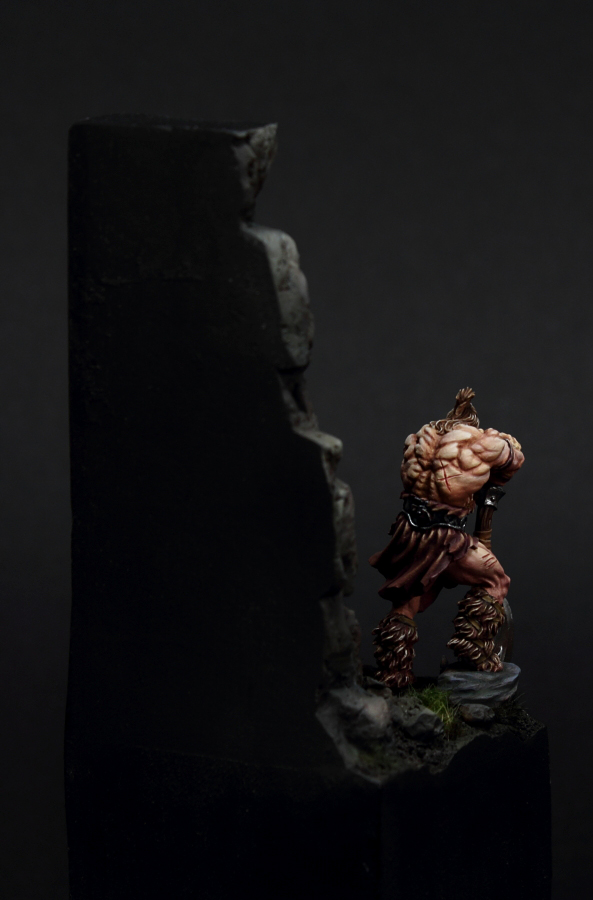
It's been a while since I've posted a finished showcase project. But now I'm able to proudly present you my interpretation of the infamous Barbarian Dude. 

Due to it's refreshing and for me very interesting sculpt he was sold out pretty damn fast. So I wasn't able to grab one in time. Maybe I was considering way too much if its worth my money or not. Lucky me that my best friend gave me one to my birthday! :) and what else should I've done then immediately start thinking about what to do with him. 

There are plenty of gorgeous versions of this miniature, like the ones from P1per:


...or Weisern, who've used a nice contrast on his scene:


Some people added a slain beast / giant as a trophy to her base. Something that came to my mind too when I was thinking about a scenery:


And Raffa:


There's even a very simplistic version, painted by Camelson. I think his version was the first painted Dude I've seen on the www:


I knew that I am not a bad painter. But I'm also far away from being one of the top painters right now. 

So my thoughts were stumbling over themselves, searching for an idea to make something different out of my Dude. One of the 350. 

While I was thinking about that I was reading a great fantasy novel, written by David Gemmell. The main character in that story was a a big Dude (Druss) which probably could become my version. Inspired by this I started to think about it. In these books Druss started his journey aged 17, a simple wood worker with raw power in his arms, often describe as a bear due to his appearance. 

Later he became a famous warrior searching for his robbed wife. His journey lasts several years before he was able to find her. Many stories were told about him until that moment, and even more would follow. 

He became an old, wise warrior who never lost his strength. 

So, here's my version of the Barbarian Dude:

Druss The Legend
(also known as Deathwalker)

"Druss is the grandson of Bardan the Slayer, a psychotic madman driven insane by the demon residing within his cursed axe, Snaga the Sender. Druss is described as a physically imposing man, immensely strong but also possessing great speed and dexterity"


I'd be happy to receive some feedback on this on especially on what I could have done better. I'm sure that I won't do any further brushstroke on this project, but it's always a good way to search for improvement for upcoming projects. 

If you want to vote, you can do that right here:


Wednesday, August 7, 2013

Hey, Mr. Rhino - Part II

posted by DarkSpawn
Hey folks,

time for a new update of my Mr. Rhino!

Many things happend in the last weeks, I removed the weapon and armor parts, corrected the body volumes and started from the ground with adding the details and clothing/armor parts.

Sometimes it's a bit hard to sculpt without any concept, but it can be also nice to let things happen and try new stuff to get more experience. It's like sketching out of the head, only with putty instead of paper, the more you try the better you get. ;-)


More details will follow soon!
DarkSpawn

Tuesday, August 6, 2013

DKoK: Painting Tutorial

posted by Nathelis
Hi folks,

this time I´m back with a paint scheme tutorial for my new Death Korps of Krieg Army. So this is a small step by step and color recipe article.

I want the Army to look at home at a cold Winter urban fields, or maybe at ash wastes urban field. The colors were chosen with that in mind.


1. Building the miniature and basing it with Vallejo sandy paste, concrete rubble mix, and a little pieces of barbed wire. Priming was done with airbrush and first black, then zenithal white (2K priming).


2. Blending of the trenchcoat. I went for grey-blue winter colors. You'll notice that on the backside the coat is highlighted zenithal downwards, this is done against realism but for a nicer view on the tabletop.


Color recipe for the blending:

VMC Black
VMC Dark Bluegrey
VMC Dark Sea Blue
P3 Trollblood Base
VMC Blue Grey Pale
VMC Pale Blue
VMC White


3. Paint the gasmask, as this is the central theme of the Krieg army I painted it different than the rest of the Model. In very light colors. Note that there is texture on it and it's highlighted around the seams.

Color recipe:
VMC Cork Brown
VMC Iraqui Sand
VMC Deck Tan
VMC White

4. Paint boots and leggins/gloves. For the boots I wanted a worn leathery look. This is achieved by painting sharp highlight dots on the edges. The leggins are simply highlighted in various steps. Always remember where the light hits them from the most commong angle and highlight that part stronger.


Color recipe (boots):

VMC Black/VMC Flat Brown 50/50
VMC Flat Brown
VMC Cork Brown
VMC Iraqui Sand

Color recipe (leggins):

VMC Black/Cork Brown 50/50
VMC Cork Brown
VMC Iraqui Sand
VMC Deck Tan

5. Paint helmet and carapace armour. I wanted them to look black and dark, so while I used my usual silver NMM colors, most of the surface had to remain black with very light highlights, that are blended in a very short space to black. If you make too much of the space a highlight area, it will look grey and not black.


Color Recipe (Black):
VMC Black
VMC Dark Sea Blue
VMC White

6. Paint the violet parts. I choose a cold violet as my company colors. This bonds the army together and differentiates them from other Krieg companies (If i were ever to paint a second company...). Remember, you can desaturate colors by adding a grey of the same lightness level to it. So if the violet you have is too bright and colorful, add a bit of black/grey or white to it.

Color recipe:
VMC Black
VMC Purple
VMC White

7. Paint metallics and grey respirator. Metallics were done in TMM style with Black, GW Chainmail and VMC Metal Medium. First one can mix Black with Chainmail, to get a Dark basecoat of the areas. Then highlight with pure Chainmail and then put dot highlights with Metal Medium where the reflections should be.


The grey parts of the respirator and cable was done in 3 highlightning steps from Black basecoat.

VMC Black/London Grey 30/70
VMC London Grey
VMC White

8. Paint additional parts, pistol holder, knife, Vox cable and Vox


Pistol holder and Knife were blended with the recipe from Step 7. The vox cable was black and P3 Coal Black in different layers of transparency. The Vox itself is painted black and highlighted on the edges with Chainmail and Metal Medium.

9. basing and finishing the miniature

First I applied a layer of AK Fresh Mud to the base, and while this is still wet, put various grey pigments on that. Pk-Pro crushed glass was added for the snowy/ash effect and everything fixed with AK Gravel&Sand Fixer.


Hope you enjoyed that little tutorial, and if you like the miniature, you can vote on CMON for it: http://www.coolminiornot.com/338426

keep on happy painting,

Nathelis

Monday, August 5, 2013

Painting ALEPH the different way

posted by Hddvh
Hey there!

Me and a friend of mine decided to start playing Infinity recently. My decision for the faction was ALEPH. There weren't any game wise thoughts included when deciding what to play, it's just because I like the models of this faction the most.


As I'm not a friend of copying the given color scheme (mostly white, black & pinkish) there's a different scheme on my miniatures with a very limited color palette. I actually used just 2 colors excluding black and white.


This miniature was supposed to be painted in a classic TT-quality. But as I had so much fun painting this little fellow I decided early to aim for a higher quality.


You might notice that he's based on an acrylic disc. Both, me and my friend, are using these to maximise the impression of "non-based" miniatures. And it works. During our first game the full advantage of those bases came through. 

You can find more views over at Putty&Paint as on CMON.

I'd be happy for any comment, critique and vote.

There are some more miniatures of this one on my painting desk. I'm planning to write up a step by step for you. So keep watching ;)

Cheers
Arne

Sunday, July 21, 2013

Barbarian Dude - Finished

posted by p1per
Heya!

Barbarian Dude finally finished. :)


He has been way too long now on my workbench and as my motivation was slowly dropping it was about time to "finish" him and start something new. There are still certain things that could/should be improved but overall I'm quite happy how he turned out.


Some detail-pix:


... and voting links ;)

Putty & Paint

CoolMiniOrNot


Hope you like him :)


p1per

Friday, July 12, 2013

Hey, Mr. Rhino - WIP

posted by DarkSpawn
And here we go...again!

Good morning folks!
Long time no see. ;-) But the last weeks I was very busy testing the good new sculpting-putty "BeesPutty" from Masq-Mini by Stefan Niehues. I love that stuff more and more I work with.
You can apply it directly on the wire without the need of a Green Stuff layer, really great.
It's available in two grades, the normal one (like butter from the fridge, easy to knead) and a firmer one, very good for fine details or a stable frame.

One of the results is actually a wip I started last week sunday, but in fact since I don't have a reference it's still a bit of a mess to sculp.
It all starts like every time with a wireframe, followed by a quick sketch of volumes and proportions.


 After a short time of sculpting I changed the pose of the right arm.


For testing purposes I added some stuff to get an overview how it could look.


After that I started to define the face.


Next steps will be correcting the body volumes to get a homogeneous shape and working on the details.

See you soon with some more progress on the Rhino!
DarkSpawn

Saturday, June 22, 2013

Exploring BeeSputty!

posted by Hddvh
Good morning guys 'n gals!

It's a beautiful morning over here and I'm already relaxing in the garden. Yep, just before the breakfast. 
Me and my family are on vacation for some days. As my painting equipment wasn't able to find a space to come with me I decided to take some sculpting tools with me and tested the new BeeSputty. 

Here's my result so far, just added basic volumes so far:


As I'm not an experienced sculpteur (this is my 2nd attempt) I'd be happy to receive some feedback from you. 

Soon more pictures for you!

Have a nice weekend. 

Yours Sleipnir